The FileMaker Platform gives you plenty of options for exporting data out of your app. You can export files as text or even a separate FileMaker file but in our experience, the most common export format is Excel. It's pretty easy to export data out of FileMaker into Excel; the tricky part is customizing the headers of the exported data.
Why would you want to customize the headers? You may want to customize headers so that they're easy for the user to understand or to make them consistent with field names in other systems. For example, some of our developers like to group the "name" fields in a contact database by having them all start with the text "name" – nameFirst and nameLast instead of First Name and Last Name. So when we export that data natively from FileMaker, the column header will be nameFirst, not First Name. I won't get into why we do that here; that's a whole other blog post about field FileMaker naming conventions.
Custom Function
To do this, we'll use an XML style sheet, a custom function and a short script. Please note, our technique is a bit advanced and assumes you are comfortable with all three mechanisms, particularly FileMaker scripts.
The idea is to use the XML style sheet to append a custom row of headers to a CSV file that will open in Excel after your exported file is created. Before we get started, you'll want to download the Contacts sample file, which includes the custom function called ExportXSLT. This custom function has been knocking around the Internet and The Support Group for a while. We don't know where it came from, but we are grateful to the unknown author out there in the Interwebs for sharing the knowledge!
Step 1. Create a variable for the file path of the file. This will be where we ultimately export the file. I’ve created a simple calculation that will set this to my desktop folder, but you can save it anywhere really - just remember where to find it when the time comes.

Step 2. Create a variable for the file path of the style sheet. I usually put this in a temporary folder. We’re going to create this style sheet every time we export so we don’t really need to keep it. Putting it in the temporary folder will ensure that it will be deleted when FileMaker closes.

Step 3. Create your header text. Be sure to separate each header value with a comma.

Step 4. Use your custom function. Using the variable you just created for the header row, feed that variable into your custom function and store it in a global field in your database.

Step 5. Export that global field to the temporary folder using the file path variables you set up at the beginning of the script.

Step 6. The final step, export the records. This is the key step, where you’ll bring everything you’ve done so far together. It’s just one line of code, but it has lots of settings so let’s unpack it. Here’s the one line:

You have several options here. You want to go into options for “Specify output file” and “Specify export order.”

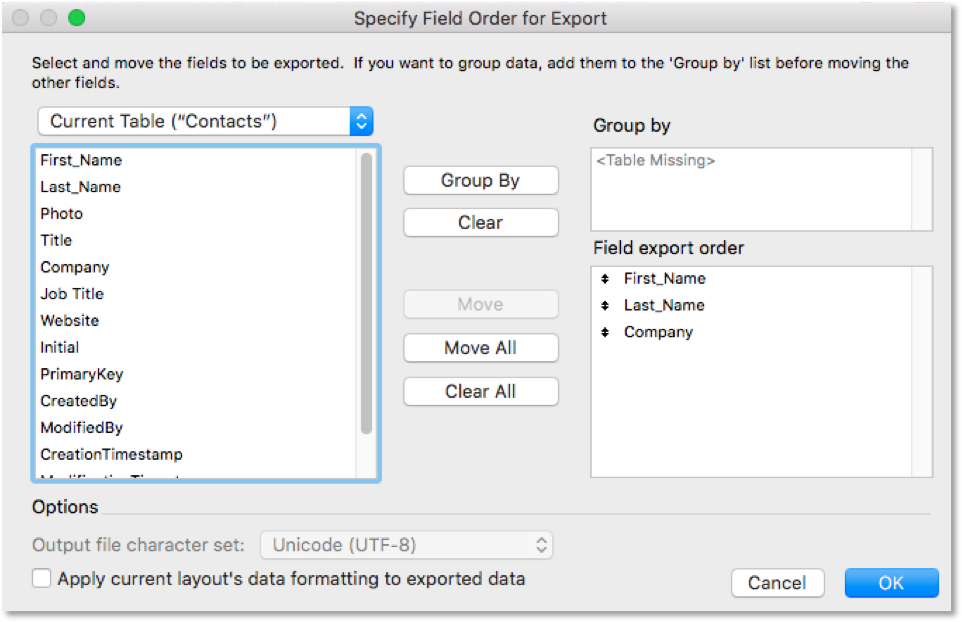
For Specify export order, you want to export the fields in the exact order that you set up your custom headers. Of course, this is easy for three columns, but the more fields you have, the more complicated this can be. Make sure you test and run the script several times to ensure that your fields match to your custom headers. In my example, I only have three fields and they match the order in my header variable.
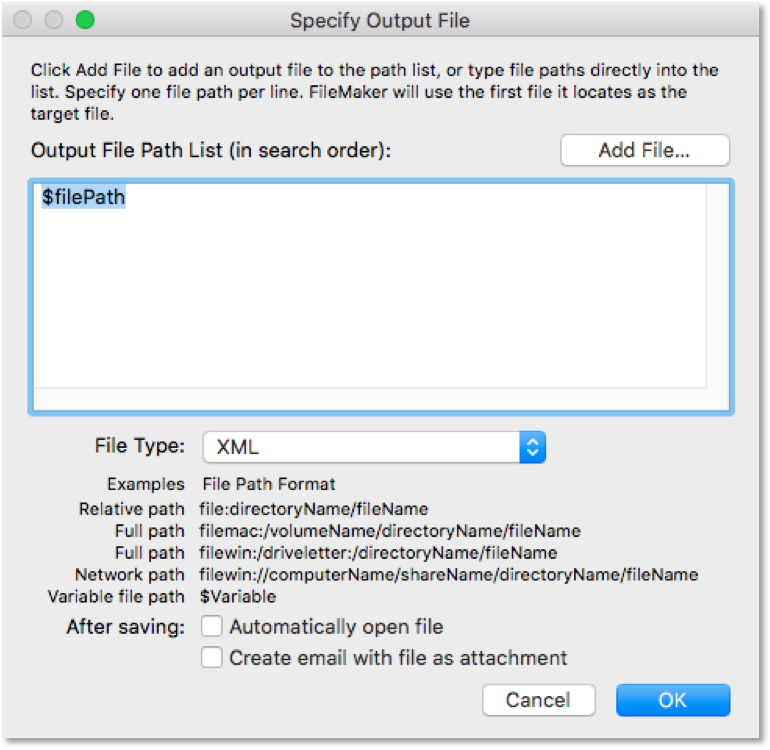
Now, this is the most complicated part, Specify Output File. Specify the output file path to the file path variable you set at the beginning of the script. Select XML under File Type. This might appear to be counterintuitive, but trust me.
When you click OK, you'll be presented with a second dialog box that looks like this.
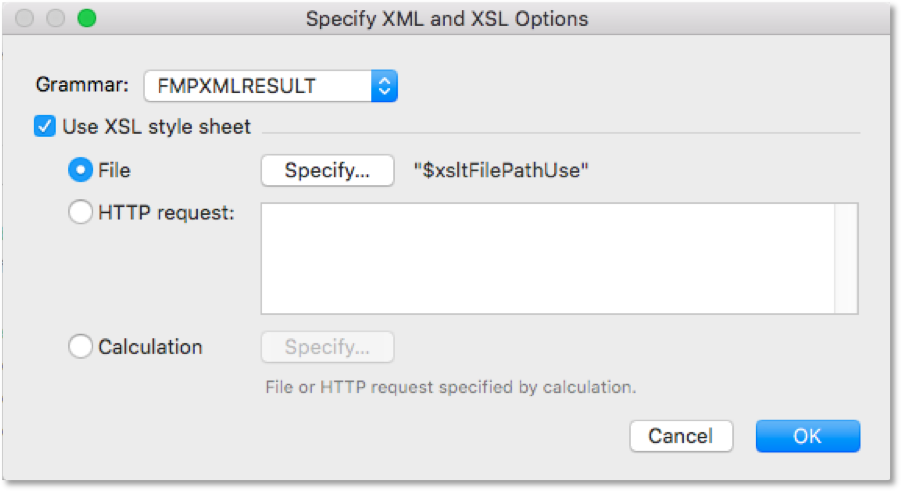
Use the FMPXMLRESULT grammar and set the file path of the XSL style sheet to the variable you specified at the beginning of your script. Click OK.
The last few steps will tell FileMaker to use the custom style sheet you saved in your temporary folder when it creates the exported file. Here's what the script looks like in its entirety.

And that’s it! A simple technique to ensure your end product is as useful as possible for the end user. Watch the demo to see this script in action.
Find more FileMaker developer tips.

This article is also posted on FileMakerProGurus.com.